


A bow can make a dress feel softer, more polished, and far more intentional. It can also do the opposite when the loops sit unevenly, the knot twists, or the sash starts sliding before you even leave the house. If you have ever stood in front of a mirror asking yourself how to tie a bow in a dress, the problem usually is not the dress. It is the technique, the placement, and the way the fabric behaves once it is on your body.
This guide walks you through practical, wearable ways to tie a bow on a dress so it looks clean from every angle. You will learn how to tie a front bow, a side bow, and a back bow; how to handle self-tie sashes, shirt dresses, and wrap styles; how to keep a bow from slipping; and how to make the finished shape flatter your waist instead of adding bulk in the wrong place.
The goal here is not a decorative bow that only works on a mannequin. The goal is a bow that looks balanced when you are walking, sitting, taking photos, and moving through real life. That matters whether you are getting dressed for work, brunch, vacation, dinner, a birthday, or a wedding guest look that needs a little softness around the waist.
What you will get in this guide: clear step-by-step instructions, easy fixes for common mistakes, body-friendly placement tips, and outfit ideas you can actually wear again.
Quick Jump Links
- Why a Bow Changes the Look of a Dress
- Know What Kind of Tie You Are Working With
- Before You Start: Prep for a Clean Bow
- How to Tie a Front Bow in a Dress
- How to Tie a Side Bow in a Dress
- How to Tie a Back Bow in a Dress
- How to Tie Wrap Dresses and Shirt Dresses
- How to Handle Longer Sashes on Maxi Dresses
- Where a Bow Should Sit on Your Waist
- How to Keep a Dress Bow from Slipping
- Common Bow-Tying Mistakes
- How to Style Bow-Tie Dresses for Real Occasions
- Shop Tie-Waist Dresses at Uoozee
- FAQ
Why a Bow Changes the Look of a Dress
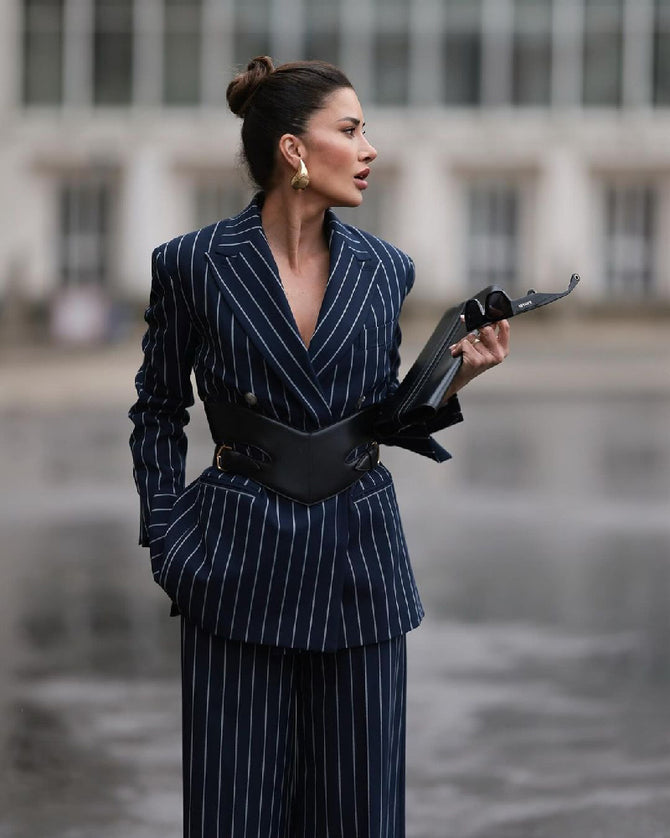
A bow is not just decoration. On a dress, it changes proportion. It tells the eye where the waist begins, where volume starts, and where the silhouette should feel finished. A clean bow can make a loose dress look shaped, a simple dress look styled, and a minimal dress feel softer without adding heavy accessories.
That is why the same dress can look completely different depending on how you tie it. A low, drooping bow can make the waistline feel heavy. A tight, tiny bow can look stiff and unfinished. A side bow can create movement and lightness, while a centered front bow can make the waist look defined and symmetrical.
When you tie a bow well, it does three things at once:
- It gives the dress structure.
- It creates a focal point without needing extra styling.
- It helps the dress feel fitted even when the overall cut is relaxed.
That balance is especially useful on dresses with self-tie waists, soft woven fabrics, or flowing skirts where you want shape but do not want the outfit to feel rigid.
Know What Kind of Tie You Are Working With
Before you start tying anything, look at the construction of the dress. Not every tie behaves the same way, and a bow that works beautifully on one style can look bulky or awkward on another.
1) Attached waist ties
These are stitched into the side seams or waistline and are meant to define the dress where it already wants to sit. They are usually the easiest to turn into a balanced bow because the starting point is fixed.
2) Long self-tie sash belts
These often come with shirt dresses, midi dresses, and maxi dresses. They are versatile, but the extra length means the loops and tails can easily become too big if you do not control them from the first knot.
3) Wrap dress ties
Wrap dresses often need function first and decoration second. The tie has to hold the overlap closed, sit comfortably at the waist, and then still look pretty. That means the hidden knot underneath matters just as much as the visible bow.
4) Back ties
These usually appear on dresses with cleaner fronts. The bow becomes part waist definition, part back detail. The challenge is less about shape and more about keeping the loops even when you cannot see them directly.
5) Thin tie belts
These can look elegant, but they also twist faster and lose shape sooner. A smaller, neater bow usually looks better than a dramatic oversized one.
If your dress uses a sash rather than a structured belt, think of the fabric like part of the dress, not an accessory. It needs to move with the dress, not fight it.
Before You Start: Prep for a Clean Bow
A polished bow begins before the actual tying. Small prep steps make a bigger difference than most people expect.
Smooth the fabric first
If the ties are twisted, wrinkled, or folded into themselves, the bow will never look clean. Flatten the sash with your fingers before you make the first knot. If the dress came folded in packaging, a little steaming helps the bow look softer and fuller.
Find your real waist placement
Do not assume the tie should sit exactly where the seam sits. Sometimes moving the bow half an inch higher or lower makes the dress look far better on your body. You want the tie to support the silhouette, not cut it in the wrong place.
Make the lengths even
Hold both ends before tying and check that they start at roughly the same length. Uneven tails at the beginning almost always become a lopsided bow at the end.
Decide on the finish first
Ask yourself what you want before you tie it:
- Soft and romantic
- Clean and minimal
- Waist-defining and structured
- Relaxed and effortless
The answer changes how tight you make the first knot, how large the loops should be, and whether the bow belongs at the front, side, or back.
Quick rule: the lighter and softer the fabric, the more controlled your first knot needs to be. The heavier and stiffer the fabric, the more you need to soften the loops so the bow does not look rigid.
How to Tie a Front Bow in a Dress
A front bow is the most symmetrical option. It works especially well on dresses with simple necklines, clean bodices, and waists you want to define. When done well, it makes the dress look intentional without needing much else.
Step-by-step: classic front bow
- Step 1: Pull both ends around your waist and flatten them so they are not twisted.
- Step 2: Cross one end over the other and tie a firm first knot, just like the first half of tying shoelaces.
- Step 3: Adjust that first knot so it sits flat against the body. This is the anchor that keeps everything stable.
- Step 4: Fold one end into a loop.
- Step 5: Wrap the other end around that loop and pull it through to create the second loop.
- Step 6: Pull the loops gently outward while holding the center knot steady.
- Step 7: Adjust the loop size and tail length until both sides look balanced.
- Step 8: Turn the knot slightly with your fingers so the bow lies flat instead of pointing upward.
The most flattering front bows usually have medium-sized loops and tails that fall cleanly downward rather than sticking out sideways. Too small and the bow disappears. Too large and it starts to dominate the midsection.

When a front bow works best
A front bow usually looks strongest when the dress front is visually clean. If the dress already has heavy ruffles, a busy print, or strong buttons down the middle, a side bow often looks lighter and easier.
How tight should a front bow be?
Tight enough that the waist feels defined, loose enough that the fabric still drapes. If you feel the dress pulling across the bust or wrinkling sharply below the knot, you have tied it too tight. The dress should look shaped, not strained.
How to Tie a Side Bow in a Dress
A side bow is often the most flattering and the easiest to wear. It softens the waist without putting extra bulk directly at the center of the body. It also photographs beautifully because it adds movement and detail from multiple angles.
Step-by-step: easy side bow
- Step 1: Bring both ties to one side of your waist, usually your natural side seam or just slightly forward of it.
- Step 2: Tie the first knot firmly at that point.
- Step 3: Make the first loop a little smaller than you think you need.
- Step 4: Form the second loop and pull both loops gently until they sit flat.
- Step 5: Angle the finished bow slightly downward so it looks relaxed instead of stiff.
This placement works especially well when you want the waist to look defined but not overly emphasized. It is also a great option when the fabric is soft and fluid, because the tails can fall along the skirt in a very natural way.

Why side bows are so wearable
They are forgiving. If the loops are not perfectly identical, the bow still tends to look intentional because the placement itself is more relaxed. That makes side bows ideal on everyday dresses, vacation dresses, lunch dresses, and event looks where you want elegance without fuss.
Who benefits most from a side bow?
If you feel that centered waist details draw too much attention to your midsection, a side bow often feels much better. It still creates shape, but the focus shifts slightly outward, which keeps the look lighter.
How to Tie a Back Bow in a Dress
A back bow creates a cleaner front and a more finished back view. It can feel romantic, especially on dresses with simple fronts, open backs, or softer silhouettes. The challenge is that you usually cannot see the bow directly while you are tying it.
Step-by-step: back bow that does not look messy
- Step 1: Tie the first knot at the back waist, making sure the tie is centered.
- Step 2: Keep the first knot flatter than you would for a front bow. Back bows look better when they are smooth.
- Step 3: Form the loops smaller than usual. Oversized back bows can look bulky when you sit against a chair.
- Step 4: Use a mirror or your phone camera to check symmetry.
- Step 5: Adjust the tails so they fall vertically rather than bunching under the bow.
If the fabric is slippery, make the first knot slightly tighter than normal before forming the loops. That hidden stability matters more at the back because you are less likely to keep adjusting it through the day.
Try a half-bow when full loops feel bulky
Not every dress needs a traditional two-loop bow. A half-bow or soft knot with one folded loop can look cleaner on thicker fabrics, wider sashes, or dresses where you want waist definition without a decorative finish.
A half-bow is also useful when the sash is shorter than expected. Instead of forcing a tiny full bow, let the shape stay simple and elegant.
How to Tie Wrap Dresses and Shirt Dresses
Wrap dresses and shirt dresses need a slightly different approach because the tie is doing more than one job. It is shaping the waist, controlling drape, and often holding the dress in the right position while you move.
How to tie a wrap dress bow
On a wrap dress, the inside tie or hidden fastening needs to be secure first. Once the inner layer feels stable, smooth the outside panel across the body before tying the visible sash. That extra smoothing step is what keeps the waist from looking twisted or bunchy.
- Secure the inner fastening first.
- Pull the outer panel across the body without overtightening.
- Tie the first visible knot where the wrap naturally sits.
- Finish with a front or side bow depending on the dress design.
If the wrap opens too much at the bust when you tighten the waist, the answer is usually not “pull harder.” The answer is to adjust the placement and tension so the dress sits correctly before the bow is finished.
How to tie a shirt dress bow
Shirt dresses often look best with a bow that feels neat rather than overly pretty. Because the dress already has structure through the collar, placket, and sleeves, a smaller bow usually balances the look better than dramatic oversized loops.

For shirt dresses:
- Keep the knot flat.
- Make medium or smaller loops.
- Let the tails fall cleanly into the skirt.
- Use the bow to sharpen the waist, not overwhelm the dress.
If you like collared silhouettes, the easiest place to browse similar shapes is the shirt dresses collection. These styles usually respond well to a neat side bow or a soft center tie.
How to Handle Longer Sashes on Maxi Dresses
Maxi dresses often come with longer ties, softer drape, and more fabric movement overall. That can be beautiful, but it also means the bow can quickly become oversized if you do not control the scale.
What changes on a maxi dress?
- The skirt already has visual volume.
- The sash is often longer.
- The bow has to balance a longer vertical line.
Because of that, you usually want clean loops and longer tails, not huge loops and short little ends. Longer tails help the bow feel proportional to the dress length.

Best maxi bow rule
Think elegant, not puffy. Let the shape feel elongated. On a maxi dress, a side bow or a clean front bow with narrow loops often looks more elevated than a very round bow.
If you want extra inspiration for longer hemlines, a refined option is this A-line wrap pleated V-neck maxi dress, where a controlled tie helps the shape stay long and flattering instead of heavy at the waist.
Where a Bow Should Sit on Your Waist
Placement matters just as much as the tying itself. Even a perfect bow can look off if it sits in the wrong place on your body.
At the natural waist
This is the most classic placement. It works well when you want balanced proportion and a clearly defined waistline.
Slightly above the waist
This can make the legs look longer and often works well on midi and maxi dresses. It is especially useful when the dress is more relaxed through the torso and you want a lifted silhouette.
Slightly below the waist
This can work on straighter dresses or when the dress itself is cut with a lower waist seam. It usually feels more relaxed, but it is less flattering if the bow becomes the widest point of the body.
Body-friendly placement tips
- If you are petite: keep the bow smaller and place it a touch higher so it does not visually shorten the body.
- If you have a fuller bust: avoid pushing the bow too high, or the chest and waist details can crowd each other.
- If you want a softer midsection focus: a side bow often feels more forgiving than a centered front bow.
- If the dress is very flowy: slightly higher placement usually keeps the shape fresher and more lifted.
There is no single correct answer. The right placement is the one that makes the dress look balanced on you when you step back from the mirror.
How to Keep a Dress Bow from Slipping
Some fabrics hold a bow beautifully. Others start sliding the moment you move. If your bow keeps loosening, you do not need to keep retying it all day. You need more grip at the base.
Use a firmer first knot
Most slipping starts because the base knot is too loose. Secure the first knot properly before making loops. The visible bow should be decorative, but the first knot should do the real work.
Flatten the sash before tying
Twisted fabric slides more easily. Smooth fabric also looks more polished once the bow is formed.
Scale the loops down
Large loops are heavier. Heavier loops drop faster. If the fabric is silky or lightweight, smaller loops usually stay in place better.
Use hidden support when needed
For special occasions or long wear, a tiny hidden safety pin on the underside of the knot can keep the placement secure without affecting the look. You can also use double-sided fashion tape very lightly under the sash if the dress fabric allows it.
Match the bow size to the fabric
Soft, thin fabric needs cleaner, smaller bows. Heavier fabric can support more volume. Trying to force a dramatic bow out of a slippery sash usually ends in droop.
If you want more belt-specific troubleshooting, this detailed guide on how to tie a belt for a dress is a useful next read, especially for sashes, waist belts, and wrap-dress ties.
Common Bow-Tying Mistakes
Most bow problems come from a few very fixable habits.
Making the loops too big
This is the fastest way to make a bow look floppy. If the loops are large, the knot looks weak and the tails often become too short. Start smaller and expand only if the dress can handle it.
Ignoring the first knot
The prettiest loops in the world will not save a weak base. The first knot determines security and placement.
Letting the sash twist
Twists make the bow look messy and cheap. Smooth the tie before every step, especially on satin-like or lightweight fabrics.
Placing the bow too far forward on the hip
A side bow usually looks best close to the waist, not drifting down onto the hip. Too low and the shape loses polish.
Overtightening the waist
The bow should define the waist, not pull the dress into horizontal wrinkles. If the bodice starts straining or the skirt bunches upward, loosen the base knot and retie.
Using the same bow style on every dress
A structured midi, a collared shirt dress, and a flowing maxi do not need the same finish. Adapt the bow size and placement to the personality of the dress.
How to Style Bow-Tie Dresses for Real Occasions
A well-tied bow already does part of the styling for you, which is why tie-waist dresses are so practical. They can look complete without much extra effort. The key is choosing accessories that support the shape instead of competing with it.
For daytime plans
Keep the bow soft and the accessories simple. Think clean sandals, flats, or easy low heels. When the bow is the waist detail, you usually do not need a statement necklace and dramatic earrings at the same time.
For work or smarter casual looks
On more tailored dresses, a smaller side bow or neat front tie feels polished. A belt-focused midi like this belted pleated lapel midi dress shows how useful a controlled waist can be when you want shape without fuss.
For dinners and events
A cleaner front bow or elegant side bow works beautifully with heeled sandals, refined flats, or a small structured bag. Let the bow create softness while the rest of the styling stays sharp.
For easy rewear value
Bow-tie dresses earn their place in your closet when you can style them more than one way. A side bow makes a dress feel more relaxed. A centered bow feels more finished. A half-bow can make the exact same dress look more minimal. That flexibility is part of why tie-waist midis remain so useful.
If you want more options that are easy to style with bows and waist ties, the midi dresses collection is a practical place to start. Midi lengths often give you the most freedom because they feel polished enough for events but still easy for everyday wear.
Shop Tie-Waist Dresses at Uoozee
When a dress has the right waist detail, you do not need to overthink the outfit. You need a shape that ties cleanly, fabric that drapes well, and a silhouette that still feels comfortable once you move through the day.
If you want dresses that work especially well with bows, self-tie waists, and sash styling, start with longer silhouettes that give the ties room to fall beautifully. Explore the Shop Maxi Dresses
Look for soft wrap shapes, defined waists, easy shirt-dress structures, and flowing skirts that let the bow feel like part of the silhouette instead of an afterthought.
FAQ: How to Tie a Bow in a Dress
How do you tie a perfect bow on a dress?
Start with even tie lengths, secure a firm first knot, then make two balanced loops and adjust them gently. The cleanest bows come from a flat base knot, smooth fabric, and loops that are not too large.
Is it better to tie a dress bow in the front or on the side?
It depends on the dress. A front bow looks symmetrical and classic, while a side bow often feels softer and more flattering because it adds shape without putting all the focus at the center of the waist.
How do you tie a bow on a wrap dress?
Secure the inner fastening first, smooth the outer panel across the body, then tie the visible sash at the waist. The wrap needs to feel stable before you form the decorative bow.
Why does my dress bow keep slipping?
The first knot is usually too loose, the loops are too large, or the fabric is slippery. Tighten the base knot, smooth the sash flat, and make slightly smaller loops so the bow holds its shape better.
How do you tie a bow in the back of a dress by yourself?
Tie the base knot first, keep the loops a little smaller than usual, and check the final shape with a mirror or your phone camera. A back bow usually looks better when it is neat and controlled rather than oversized.
What is the most flattering bow placement on a dress?
For most dresses, the natural waist or just slightly above it is the most flattering. A side placement is often the easiest and most wearable if you want a softer look around the midsection.
Should dress-bow loops be big or small?
Medium or slightly smaller loops usually look best. Very large loops can droop and add bulk. The softer or more slippery the fabric, the more controlled the loop size should be.
Can you tie a bow on a shirt dress?
Yes. Shirt dresses usually look best with a neat, medium-sized bow or even a soft half-bow. Because the dress already has structure, the tie should sharpen the waist rather than overpower the silhouette.
What if my sash is too long?
Do not make the loops huge just to use up fabric. Keep the loops controlled and allow the tails to stay longer. On midi and maxi dresses, longer tails often look more elegant than oversized loops.
How do you make a bow look less bulky?
Flatten the sash before tying, reduce the loop size, tighten the first knot properly, and angle the bow slightly instead of forcing it into a stiff round shape.

